문서를 불러오는 중...
Spring Framework Reference Documentation 7.0.2의 Bean Scopes의 한국어 번역본입니다.
아래의 경우에 피드백에서 신고해주신다면 반영하겠습니다.
감사합니다 :)
bean definition을 생성할 때, 그 bean definition에 의해 정의된 class의 실제 instance를 생성하기 위한 recipe를 생성하게 됩니다. bean definition이 recipe라는 개념은 중요합니다. 이는 class와 마찬가지로 하나의 recipe로부터 많은 객체 instance를 생성할 수 있다는 것을 의미하기 때문입니다.
특정 bean definition으로부터 생성된 객체에 주입될 다양한 의존성과 설정 value를 제어할 수 있을 뿐만 아니라, 특정 bean definition으로부터 생성된 객체의 scope도 제어할 수 있습니다. 이 접근 방식은 강력하고 유연합니다. Java class 레벨에서 객체의 scope를 미리 고정해 두는 대신, 설정을 통해 생성하는 객체의 scope를 선택할 수 있기 때문입니다.
Bean은 여러 scope 중 하나로 배포되도록 정의될 수 있습니다. Spring Framework는 여섯 가지 scope를 지원하며, 이 중 네 가지는 web-aware ApplicationContext를 사용하는 경우에만 사용할 수 있습니다. 또한
custom scope를 생성할 수도 있습니다.
다음 표는 지원되는 scope를 설명합니다:
| Scope | Description |
|---|---|
| singleton | (Default) 하나의 Spring IoC 컨테이너마다 하나의 객체 instance에 단일 bean definition을 scope 합니다. |
| prototype | 단일 bean definition을 임의의 개수의 객체 instance에 scope 합니다. |
| request | 단일 bean definition을 단일 HTTP request의 lifecycle에 scope 합니다. 즉, 각 HTTP request는 단일 bean definition을 기반으로 생성된 bean의 자체 instance를 갖습니다. web-aware Spring ApplicationContext context에서만 유효합니다. |
| session | 단일 bean definition을 HTTP Session의 lifecycle에 scope 합니다. web-aware Spring ApplicationContext context에서만 유효합니다. |
| application | 단일 bean definition을 ServletContext의 lifecycle에 scope 합니다. web-aware Spring ApplicationContext context에서만 유효합니다. |
| websocket | 단일 bean definition을 WebSocket의 lifecycle에 scope 합니다. web-aware Spring ApplicationContext context에서만 유효합니다. |
Table 1. Bean scopes
thread scope가 제공되지만 기본적으로 등록되어 있지는 않습니다. 더 많은 정보는
SimpleThreadScopedocumentation을 참고하십시오. 이 scope 또는 다른 custom scope를 등록하는 방법에 대한 지침은 Using a Custom Scope를 참고하십시오.
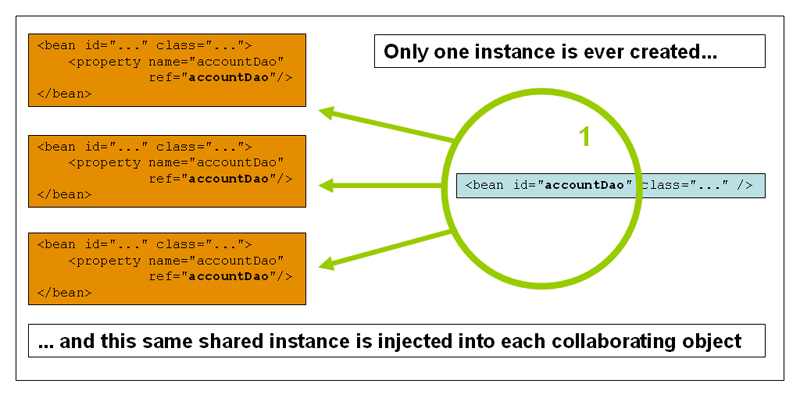
singleton bean의 단 하나의 shared instance만이 관리되며, ID 또는 ID들이 해당 bean definition과 일치하는 bean에 대한 모든 요청은 Spring 컨테이너에 의해 그 특정 bean instance 하나만을 반환합니다.
다른 말로 하면, bean definition을 정의하고 그것이 singleton으로 scope 되면, Spring IoC 컨테이너는 그 bean definition에 의해 정의된 객체의 instance를 정확히 하나 생성합니다. 이 단일 instance는 이러한 singleton bean들의 캐시에 저장되며, 그 이름을 가진 bean에 대한 이후의 모든 요청과 참조는 캐시된 객체를 반환합니다.
다음 이미지는 singleton scope가 어떻게 동작하는지를 보여줍니다:
Spring의 singleton bean 개념은 Gang of Four (GoF) patterns book에서 정의된 singleton pattern과는 다릅니다. GoF singleton은 특정 class의 instance가 ClassLoader당 정확히 하나만 생성되도록 객체의 scope를 hard-code 합니다. Spring singleton의 scope는 per-container 및 per-bean으로 설명하는 것이 가장 적절합니다.
이는 단일 Spring 컨테이너 안에서 특정 class에 대해 하나의 bean을 정의하면, Spring 컨테이너는 그 bean definition에 의해 정의된 class의 instance를 정확히 하나만 생성한다는 것을 의미합니다. singleton scope는 Spring에서 기본 scope입니다. XML에서 bean을 singleton으로 정의하려면, 다음 예제와 같이 bean을 정의할 수 있습니다:
1<bean id="accountService" class="com.something.DefaultAccountService"/>
2
3<!-- the following is equivalent, though redundant (singleton scope is the default) -->
4<bean id="accountService" class="com.something.DefaultAccountService" scope="singleton"/>
Copied!
non-singleton인 prototype scope의 bean 배포는 해당 bean에 대한 요청이 있을 때마다
새로운 bean instance가 생성되도록 합니다. 즉, 그 bean이 다른 bean에 주입되거나
컨테이너에 대한 getBean() 메서드 호출을 통해 요청되는 경우입니다. 일반적으로,
stateful bean에는 prototype scope를 사용하고 stateless bean에는 singleton scope를 사용해야 합니다.
다음 다이어그램은 Spring prototype scope를 보여줍니다:
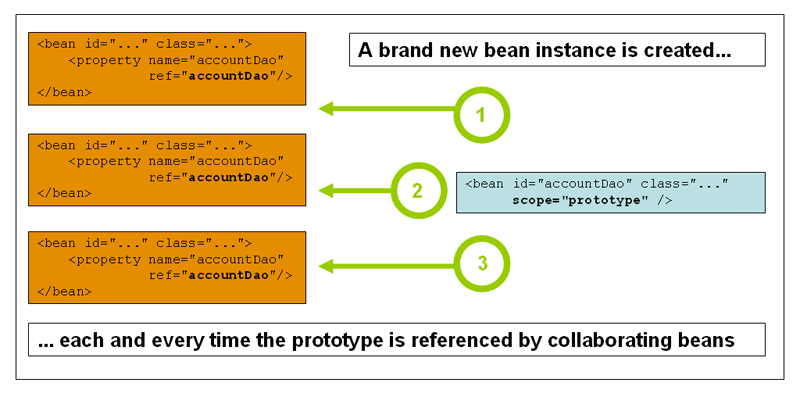
(Data access object (DAO)는 일반적으로 prototype으로 설정되지 않습니다. typical DAO는 대화형 state를 보유하지 않기 때문입니다. singleton 다이어그램의 core를 재사용하는 것이 우리에게 더 쉬웠기 때문입니다.)
다음 예제는 XML에서 bean을 prototype으로 정의합니다:
1<bean id="accountService" class="com.something.DefaultAccountService" scope="prototype"/>
Copied!
다른 scope와 달리, Spring은 prototype bean의 complete lifecycle을 관리하지 않습니다. 컨테이너는 prototype 객체를 인스턴스화, 설정, 그리고 조립한 후, 그 prototype instance에 대한 추가 기록 없이 client에 넘깁니다.
따라서, scope에 상관없이 모든 객체에 대해 initialization lifecycle callback 메서드는 호출되지만, prototype의 경우에는 설정된 destruction lifecycle callback은 호출되지 않습니다. client 코드는 prototype-scoped 객체를 정리하고 prototype bean이 보유한 비용이 큰 리소스를 해제해야 합니다. prototype-scoped bean이 보유한 리소스를 Spring 컨테이너가 해제하도록 하려면, 정리가 필요한 bean에 대한 reference를 보유하는 custom bean post-processor를 사용하는 것을 시도해 보십시오.
어떤 면에서 Spring 컨테이너의 prototype-scoped bean과 관련된 역할은 Java new 연산자의
대체물입니다. 그 시점 이후의 모든 lifecycle 관리는 client가 처리해야 합니다. (Spring 컨테이너에서
bean의 lifecycle에 대한 자세한 내용은
Lifecycle Callbacks을 참고하십시오.)
prototype bean에 대한 의존성을 가진 singleton-scoped bean을 사용할 때, 의존성은 인스턴스화 시점에 resolve된다는 점에 유의해야 합니다. 따라서 prototype-scoped bean을 singleton-scoped bean에 의존성 주입하면, 새로운 prototype bean이 인스턴스화되고 그 후 singleton bean에 의존성 주입됩니다. 이 prototype instance는 singleton-scoped bean에 제공되는 유일한 instance입니다.
그러나 singleton-scoped bean이 runtime에서 prototype-scoped bean의 새로운 instance를 반복적으로 획득하기를 원한다고 가정해 봅시다. prototype-scoped bean을 singleton bean에 의존성 주입할 수는 없습니다. 그 주입은 Spring 컨테이너가 singleton bean을 인스턴스화하고 그 의존성을 resolve하고 주입할 때 단 한 번만 발생하기 때문입니다.
runtime에서 prototype bean의 새로운 instance가 여러 번 필요하다면, Method Injection을 참고하십시오.
request, session, application, websocket scope는
XmlWebApplicationContext와 같은 web-aware Spring ApplicationContext 구현을 사용하는 경우에만
사용할 수 있습니다. ClassPathXmlApplicationContext와 같은 일반 Spring IoC 컨테이너에서
이 scope를 사용하면, 알 수 없는 bean scope에 대해 불평하는 IllegalStateException이 발생합니다.
request, session, application, websocket level(web-scoped bean)에서 bean의 scoping을
지원하려면, bean을 정의하기 전에 약간의 초기 설정이 필요합니다. (이 초기 setup은
singleton과 prototype이라는 standard scope에는 필요하지 않습니다.)
이 초기 setup을 수행하는 방법은 특정 Servlet 환경에 따라 달라집니다.
Spring Web MVC 안에서, 즉 Spring DispatcherServlet에 의해 처리되는 request 내에서 scoped bean에
접근하는 경우에는, 별도의 특별한 setup이 필요하지 않습니다. DispatcherServlet은 이미 모든 관련
state를 노출합니다.
Servlet web 컨테이너를 사용하면서 request가 Spring의 DispatcherServlet 외부에서 처리되는
경우(예: JSF 사용 시), org.springframework.web.context.request.RequestContextListener ServletRequestListener를
등록해야 합니다. 이는 WebApplicationInitializer 인터페이스를 사용하여 programmatically 수행할 수
있습니다. 또는, web 애플리케이션의 web.xml file에 다음 선언을 추가하십시오:
1<web-app>
2	...
3	<listener>
4		<listener-class>
5			org.springframework.web.context.request.RequestContextListener
6		</listener-class>
7	</listener>
8	...
9</web-app>
또는, listener setup에 문제가 있는 경우 Spring의 RequestContextFilter 사용을 고려하십시오.
filter 매핑은 주변 web 애플리케이션 설정에 따라 달라지므로, 적절히 변경해야 합니다.
다음 listing은 web 애플리케이션의 filter 부분을 보여줍니다:
1<web-app>
2	...
3	<filter>
4		<filter-name>requestContextFilter</filter-name>
5		<filter-class>org.springframework.web.filter.RequestContextFilter</filter-class>
6	</filter>
7	<filter-mapping>
8		<filter-name>requestContextFilter</filter-name>
9		<url-pattern>/*</url-pattern>
10	</filter-mapping>
11	...
12</web-app>
DispatcherServlet, RequestContextListener, RequestContextFilter는 모두 정확히 동일한 일을
수행합니다. 즉, HTTP request 객체를 그 request를 서비스하는 Thread에 바인딩합니다. 이를 통해
request- 및 session-scoped bean이 호출 chain 하위에서도 사용 가능해집니다.
다음 bean definition에 대한 XML 설정을 고려해 보십시오:
1<bean id="loginAction" class="com.something.LoginAction" scope="request"/>
Copied!
Spring 컨테이너는 각 HTTP request마다 loginAction bean definition을 사용하여 LoginAction bean의
새로운 instance를 생성합니다. 즉, loginAction bean은 HTTP request level에 scope 됩니다.
생성된 instance의 internal state는 원하는 만큼 변경할 수 있습니다. 동일한 loginAction bean
definition에서 생성된 다른 instance는 이러한 state 변경을 보지 못하기 때문입니다. 이들은 개별
request에 특화됩니다. request의 처리 작업이 완료되면, request에 scope된 bean은 버려집니다.
annotation-driven component 또는 Java 설정을 사용할 때, @RequestScope annotation을 사용하여
component를 request scope에 할당할 수 있습니다. 다음 예제는 그 방법을 보여줍니다:
1@RequestScope
2@Component
3public class LoginAction {
4	// ...
5}
Copied!
1@RequestScope
2@Component
3class LoginAction {
4	// ...
5}
Copied!
다음 bean definition에 대한 XML 설정을 고려해 보십시오:
1<bean id="userPreferences" class="com.something.UserPreferences" scope="session"/>
Copied!
Spring 컨테이너는 단일 HTTP Session의 lifetime 동안 userPreferences bean definition을 사용하여
UserPreferences bean의 새로운 instance를 생성합니다. 다시 말해, userPreferences bean은 HTTP
Session level에 effectively scope 됩니다. request-scoped bean과 마찬가지로, 생성된 instance의
internal state는 원하는 만큼 변경할 수 있습니다. 동일한 userPreferences bean definition에서 생성된
instance를 사용 중인 다른 HTTP Session instance는 이러한 state 변경을 보지 못합니다. 이들은 개별
HTTP Session에 특화되기 때문입니다. HTTP Session이 결국 버려지면, 해당 HTTP Session에
scope된 bean도 함께 버려집니다.
annotation-driven component 또는 Java 설정을 사용할 때, @SessionScope annotation을
사용하여 component를 session scope에 할당할 수 있습니다.
1@SessionScope
2@Component
3public class UserPreferences {
4	// ...
5}
Copied!
1@SessionScope
2@Component
3class UserPreferences {
4	// ...
5}
Copied!
다음 bean definition에 대한 XML 설정을 고려해 보십시오:
1<bean id="appPreferences" class="com.something.AppPreferences" scope="application"/>
Copied!
Spring 컨테이너는 전체 web 애플리케이션에 대해 한 번만 appPreferences bean definition을 사용하여
AppPreferences bean의 새로운 instance를 생성합니다. 즉, appPreferences bean은 ServletContext
level에 scope 되며, 일반적인 ServletContext attribute로 저장됩니다. 이는 Spring singleton bean과
약간 비슷하지만 두 가지 중요한 측면에서 다릅니다. ServletContext당 하나의 singleton이며,
Spring ApplicationContext당 singleton은 아닙니다(하나의 web 애플리케이션에는 여러 개의
ApplicationContext가 있을 수 있습니다). 그리고 실제로 노출되어 ServletContext attribute로
보이게 됩니다.
annotation-driven component 또는 Java 설정을 사용할 때, @ApplicationScope annotation을
사용하여 component를 application scope에 할당할 수 있습니다. 다음 예제는 그 방법을 보여줍니다:
1@ApplicationScope
2@Component
3public class AppPreferences {
4	// ...
5}
Copied!
1@ApplicationScope
2@Component
3class AppPreferences {
4	// ...
5}
Copied!
WebSocket scope는 WebSocket session의 lifecycle과 연관되어 있으며, STOMP over WebSocket 애플리케이션에 적용됩니다. 자세한 내용은 WebSocket scope를 참고하십시오.
Spring IoC 컨테이너는 객체(bean)의 인스턴스화뿐 아니라 collaborator(또는 의존성)의 wiring도 관리합니다. 예를 들어 HTTP request-scoped bean을 더 오래 사는 scope의 다른 bean에 주입하려는 경우, scoped bean 대신 AOP proxy를 주입하는 것을 선택할 수 있습니다. 즉, scoped 객체와 동일한 public 인터페이스를 노출하지만, 관련 scope(예: HTTP request)로부터 실제 target 객체를 가져와 그 real 객체로 메서드 호출을 위임할 수 있는 proxy 객체를 주입해야 합니다.
singleton으로 scope된 bean 사이에서도<aop:scoped-proxy/>를 사용할 수 있으며, 이 경우 reference는 직렬화가 가능하고, 역직렬화 시 target singleton bean을 다시 얻을 수 있는 중간 proxy를 거치게 됩니다.prototypescope의 bean에 대해<aop:scoped-proxy/>를 선언하면, 공유 proxy에 대한 모든 메서드 호출은 새로운 target instance의 생성으로 이어지며, 호출은 그 instance로 forward됩니다. 또한 scoped proxy만이 shorter scope의 bean을 lifecycle-safe 방식으로 access하는 유일한 방법은 아닙니다. injection point(즉, constructor 또는 setter argument 또는 autowired field)를ObjectFactory<MyTargetBean>으로 선언하여, 필요할 때마다getObject()호출로 현재 instance를 on demand로 가져올 수 있습니다. 이 경우 instance를 유지하거나 별도로 저장하지 않습니다. 확장된 variant로,ObjectProvider<MyTargetBean>을 선언할 수 있으며, 이는getIfAvailable과getIfUnique를 포함한 몇 가지 추가 access variant를 제공합니다. JSR-330 variant는Provider라고 하며,Provider<MyTargetBean>선언과 각 retrieval 시도마다 해당하는get()호출과 함께 사용됩니다. JSR-330 전반에 대한 자세한 내용은 여기를 참고하십시오.
다음 예제의 설정은 한 줄만 중요하지만, “how”뿐 아니라 그 뒤에 있는 “why”를 이해하는 것이 중요합니다:
1<?xml version="1.0" encoding="UTF-8"?>
2<beans xmlns="http://www.springframework.org/schema/beans"
3	xmlns:xsi="http://www.w3.org/2001/XMLSchema-instance"
4	xmlns:aop="http://www.springframework.org/schema/aop"
5	xsi:schemaLocation="http://www.springframework.org/schema/beans
6		https://www.springframework.org/schema/beans/spring-beans.xsd
7		http://www.springframework.org/schema/aop
8		https://www.springframework.org/schema/aop/spring-aop.xsd">
9
10	<!-- an HTTP Session-scoped bean exposed as a proxy -->
11	<bean id="userPreferences" class="com.something.UserPreferences" scope="session">
12		<!-- instructs the 컨테이너 to proxy the surrounding bean -->
13		<aop:scoped-proxy/> (1)
14	</bean>
15
16	<!-- a singleton-scoped bean injected with a proxy to the above bean -->
17	<bean id="userService" class="com.something.SimpleUserService">
18		<!-- a reference to the proxied userPreferences bean -->
19		<property name="userPreferences" ref="userPreferences"/>
20	</bean>
21</beans>
Copied!
1 proxy를 정의하는 line입니다.
이러한 proxy를 생성하려면, scoped bean definition에 child <aop:scoped-proxy/> element를
삽입합니다(참고:
Choosing the Type of Proxy to Create
및 XML Schema-based 설정).
request, session 및 custom-scope level에 scope된 bean definition이 일반적인 시나리오에서
<aop:scoped-proxy/> element를 필요로 하는 이유는 무엇일까요?
다음 singleton bean definition을 고려해 보고, 앞에서 언급한 scope에 대해 정의해야 하는 것과
대조해 보십시오(다음의 userPreferences bean definition은 현재 상태로는 불완전하다는 점에
유의하십시오):
1<bean id="userPreferences" class="com.something.UserPreferences" scope="session"/>
2
3<bean id="userManager" class="com.something.UserManager">
4	<property name="userPreferences" ref="userPreferences"/>
5</bean>
Copied!
위 예제에서 singleton bean(userManager)은 HTTP Session-scoped bean(userPreferences)에 대한
reference가 주입됩니다. 여기서 중요한 점은 userManager bean이 singleton이라는 것입니다.
컨테이너당 정확히 한 번 인스턴스화되며, 그 의존성(이 경우 하나, userPreferences bean)도
한 번만 주입됩니다. 이는 userManager bean이 정확히 동일한 userPreferences 객체(즉,
처음에 주입되었던 객체)만을 대상으로 동작함을 의미합니다.
이는 shorter-lived scope의 bean을 longer-lived scope의 bean에 주입할 때 원하는 동작이 아닙니다
(예: HTTP Session-scoped collaborating bean을 singleton bean의 의존성으로 주입하는 경우).
대신, 하나의 userManager 객체가 필요하고, HTTP Session의 lifetime 동안에는 해당 HTTP
Session에 특화된 userPreferences 객체가 필요합니다. 따라서 컨테이너는
UserPreferences class와 정확히 동일한 public 인터페이스를 노출하는 객체(이상적으로는
UserPreferences instance인 객체)를 생성합니다. 이 객체는 scoping mechanism(HTTP request,
Session 등)으로부터 실제 UserPreferences 객체를 가져올 수 있습니다. 컨테이너는 이 proxy
객체를 userManager bean에 주입하며, userManager bean은 이 UserPreferences reference가
proxy라는 사실을 인식하지 못합니다. 이 예제에서 UserManager instance가 의존성 주입된
UserPreferences 객체의 메서드를 호출하면, 실제로는 proxy의 메서드를 호출하는 것입니다.
proxy는 그런 다음 (이 경우) HTTP Session에서 실제 UserPreferences 객체를 가져와, 가져온
real UserPreferences 객체로 메서드 호출을 위임합니다.
따라서 다음 예제와 같이 collaborating 객체에 request- 및 session-scoped bean을 주입할 때는
다음과 같은 (올바르고 완전한) 설정이 필요합니다:
1<bean id="userPreferences" class="com.something.UserPreferences" scope="session">
2	<aop:scoped-proxy/>
3</bean>
4
5<bean id="userManager" class="com.something.UserManager">
6	<property name="userPreferences" ref="userPreferences"/>
7</bean>
Copied!
기본적으로, Spring 컨테이너는 <aop:scoped-proxy/> element로 표시된 bean에 대해 proxy를 생성할 때,
CGLIB 기반 class proxy를 생성합니다.
CGLIB proxy는 private 메서드를 intercept하지 않습니다. 이러한 proxy에서 private 메서드를 호출하려고 하면 실제 scoped target 객체로 위임되지 않습니다.
또는, <aop:scoped-proxy/> element의 proxy-target-class attribute 값을 false로 지정하여,
해당 scoped bean에 대해 standard JDK 인터페이스 기반 proxy를 생성하도록 Spring 컨테이너를
설정할 수 있습니다. JDK 인터페이스 기반 proxy를 사용하면, 이러한 proxy를 위해 애플리케이션
classpath에 추가 라이브러리가 필요하지 않습니다. 그러나 scoped bean의 class가 최소 하나의 인터페이스를
구현해야 하며, scoped bean이 주입되는 모든 collaborator는 그 bean을 해당 인터페이스 중 하나를
통해 reference해야 합니다. 다음 예제는 인터페이스 기반 proxy를 보여줍니다:
1<!-- DefaultUserPreferences implements the UserPreferences interface -->
2<bean id="userPreferences" class="com.stuff.DefaultUserPreferences" scope="session">
3	<aop:scoped-proxy proxy-target-class="false"/>
4</bean>
5
6<bean id="userManager" class="com.stuff.UserManager">
7	<property name="userPreferences" ref="userPreferences"/>
8</bean>
Copied!
class-based 또는 인터페이스 기반 proxying 선택에 대한 자세한 정보는 Proxying Mechanisms을 참고하십시오.
factory scope의 대안으로, Spring WebApplicationContext는
HttpServletRequest, HttpServletResponse, HttpSession,
WebRequest 그리고 (JSF가 존재하는 경우) FacesContext 및 ExternalContext를
Spring-managed bean에 주입하는 것도 지원합니다. 이는 다른 bean에 대한 일반적인 injection point
옆에서 type-based autowiring만으로 가능합니다. Spring은 일반적으로 이러한 request 및 session 객체에
대해 proxy를 주입하는데, 이는 factory-scoped bean에 대한 scoped proxy와 유사하게 singleton bean과
serializable bean에서도 동작한다는 장점이 있습니다.
bean scoping mechanism은 확장 가능합니다. 자신만의 scope를 정의할 수 있으며, 기존 scope를
재정의할 수도 있습니다. 그러나 후자는 bad practice로 간주되며, 내장된 singleton과 prototype
scope는 override할 수 없습니다.
custom scope를 Spring 컨테이너에 통합하려면, 이 section에서 설명하는
org.springframework.beans.factory.config.Scope 인터페이스를 구현해야 합니다. custom scope를
어떻게 구현할지에 대한 아이디어를 얻으려면, Spring Framework 자체에서 제공하는 Scope
implementation과 구현해야 할 메서드를 더 자세히 설명하는
Scope javadoc을 참고하십시오.
Scope 인터페이스에는 scope에서 객체를 가져오고, scope에서 제거하고, 제거되도록 하는 네 가지
메서드가 있습니다.
예를 들어, session scope implementation은 session-scoped bean을 반환합니다(존재하지 않는 경우, bean의 새로운 instance를 반환하고, 이후 참조를 위해 session에 바인딩한 후 반환합니다). 다음 메서드는 underlying scope에서 객체를 반환합니다:
1Object get(String name, ObjectFactory<?> objectFactory)
Copied!
1fun get(name: String, objectFactory: ObjectFactory<*>): Any
Copied!
예를 들어, session scope implementation은 underlying session에서 session-scoped bean을 제거합니다.
객체는 반환되어야 하지만, 지정된 이름의 객체를 찾지 못한 경우 null을 반환할 수 있습니다.
다음 메서드는 underlying scope에서 객체를 제거합니다:
1Object remove(String name)
Copied!
1fun remove(name: String): Any
Copied!
다음 메서드는 scope가 destroy되거나 scope 내의 지정된 객체가 destroy될 때 scope가 호출해야 하는 callback을 등록합니다:
1void registerDestructionCallback(String name, Runnable destructionCallback)
Copied!
1fun registerDestructionCallback(name: String, destructionCallback: Runnable)
Copied!
destruction callback에 대한 더 많은 정보는 javadoc이나 Spring scope implementation을 참고하십시오.
다음 메서드는 underlying scope에 대한 conversation identifier를 얻습니다:
1String getConversationId()
Copied!
1fun getConversationId(): String
Copied!
이 identifier는 scope마다 다릅니다. session scoped implementation의 경우, 이 identifier는 session identifier가 될 수 있습니다.
하나 이상의 custom Scope implementation을 작성하고 test한 후에는, Spring 컨테이너가 새로운
scope를 인식하도록 해야 합니다. 다음 메서드는 Spring 컨테이너에 새로운 Scope를 등록하는
central 메서드입니다:
1void registerScope(String scopeName, Scope scope);
Copied!
1fun registerScope(scopeName: String, scope: Scope)
Copied!
이 메서드는 ConfigurableBeanFactory 인터페이스에 선언되어 있으며, 이는 Spring과 함께 제공되는 대부분의
concrete ApplicationContext implementation에서 BeanFactory property를 통해 사용할 수 있습니다.
registerScope(..) 메서드의 첫 번째 argument는 scope와 연관된 고유한 이름입니다. Spring 컨테이너
자체에서 이러한 이름의 예로는 singleton과 prototype이 있습니다. registerScope(..) 메서드의
두 번째 argument는 등록하여 사용하려는 custom Scope implementation의 실제 instance입니다.
custom Scope implementation을 작성한 다음, 다음 예제와 같이 등록한다고 가정해 봅시다.
다음 예제에서는 Spring에 포함되어 있지만 기본적으로 등록되어 있지 않은
SimpleThreadScope를 사용합니다. 자체 customScopeimplementation에도 동일한 지침이 적용됩니다.
1Scope threadScope = new SimpleThreadScope();
2beanFactory.registerScope("thread", threadScope);
Copied!
1val threadScope = SimpleThreadScope()
2beanFactory.registerScope("thread", threadScope)
Copied!
그런 다음 다음과 같이 custom Scope의 scoping rule을 따르는 bean definition을 생성할 수 있습니다:
1<bean id="..." class="..." scope="thread">
Copied!
custom Scope implementation을 사용하면, scope의 programmatic registration에만 제한되지 않습니다.
다음 예제에서 보는 것처럼 CustomScopeConfigurer class를 사용하여 Scope registration을
선언적으로 수행할 수도 있습니다:
1<?xml version="1.0" encoding="UTF-8"?>
2<beans xmlns="http://www.springframework.org/schema/beans"
3	xmlns:xsi="http://www.w3.org/2001/XMLSchema-instance"
4	xmlns:aop="http://www.springframework.org/schema/aop"
5	xsi:schemaLocation="http://www.springframework.org/schema/beans
6		https://www.springframework.org/schema/beans/spring-beans.xsd
7		http://www.springframework.org/schema/aop
8		https://www.springframework.org/schema/aop/spring-aop.xsd">
9
10	<bean class="org.springframework.beans.factory.config.CustomScopeConfigurer">
11		<property name="scopes">
12			<map>
13				<entry key="thread">
14					<bean class="org.springframework.context.support.SimpleThreadScope"/>
15				</entry>
16			</map>
17		</property>
18	</bean>
19
20	<bean id="thing2" class="x.y.Thing2" scope="thread">
21		<property name="name" value="Rick"/>
22		<aop:scoped-proxy/>
23	</bean>
24
25	<bean id="thing1" class="x.y.Thing1">
26		<property name="thing2" ref="thing2"/>
27	</bean>
28
29</beans>
Copied!
<bean>선언 내에서FactoryBeanimplementation에 대해<aop:scoped-proxy/>를 배치하면,getObject()에서 반환된 객체가 아니라 factory bean 자체에 scope가 적용됩니다.
Method Injection
Customizing the Nature of a Bean